It's that time again! Time to catch up on scrapping Christmases past, get a head start on making your cards for this year, and break out the Christmas sweater with your Bermuda shorts for a fun Christmas in July!! Each Monday this month I'll be posting a Christmas themed project to inspire ;)
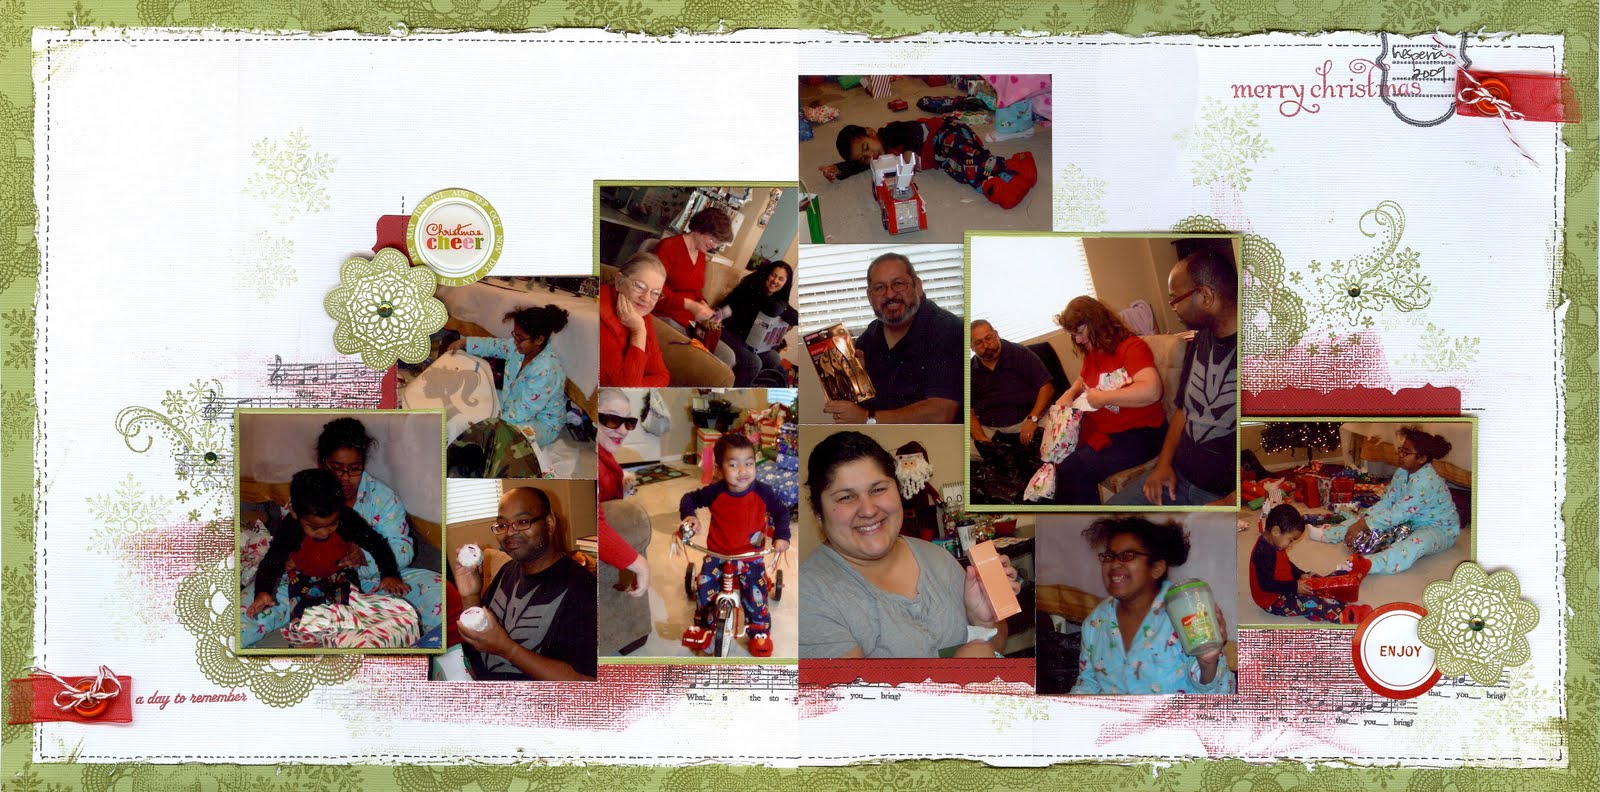
This weeks' project is a Christmas layout that uses stamps & cradstock to create a patterned paper look. Most stores aren't carrying Christmas products at this time of year so stamping is a great way to create pages out of the current season.
Many other genres of papercrafting have worked their way into “scrapbooking”. Take stamping for instance. Most “scrapbooking” paper manufacturers offer stamps that compliment their lines: October Afternoon, Making Memories, Donna Salazar, Cosmo Cricket, Sassafras Lass, Basic Grey…the list goes on and on. Well, stamps aren't just for cardmakers!

If you're like me, you've collected quite a collection of stamps over the years. And those stamps are now collecting dust. Break them out and use them! This two page layout features 4 pieces of cardstock, 3 colors of ink, and several stamp sets.
Gather these (or similar) supplies to get started:
- 2 sheets of Bazzill Hillary Cardstock (green)
- 2 sheets of Bazzill White Cardstock
- Stampin' Up! Inks in Riding Hood Red, Old Olive
- Close to My Heart Ink in Black
- Creative Imaginations Creative Cafe “Spirit Circle” Journaling Stickers in red and green
- 4 Self Adhesive Gems by Prima
- Copic Marker in Verdigirs G85 (to color gems)
- 8″ Red Organdy Ribbon
- Pinking Shears
- 12″ Baker's Twine in Red & White
- 2 Red Buttons
- Anna Griffin “Maime” Epoxy Stickers (Christmas Themed)
- Distrezz-It-All tool by Zutter and Donna Salazar
- Making Memories Christmas Stamp Set
- Inkadinkado Christmas In New York Stamp Set
- October Afternoon Thrift Shop Stamp Set
- 3D Foam Squares
- 1″ x 12″ piece of Red Cardstock
- Upper Crest Border Punch by Fiskars
- Black Pen
- Assorted Acrylic Blocks
Once you've gathered all of your supplies, we're ready to start creating!
 Cut the 2 pieces of White Cardstock to 11″ x 11.5″.
Use the Distrezz-It-All to distress the edges of the cardstock. You want a really distressed edge so run it through the Distrezz-It-All several times to shred the edges up really well.


 Ink edges with Old Olive ink and set aside.

The first feature of this layout is the green “patterned paper” base. To get this look I used a doily stamp (October Afternoon), 2 snowflake stamps (Making Memories), and Stampin' Up!'s Old Olive ink. When “random stamping”, aka creating an allover background design with stamps, you always want to start stamping with the largest image first, the doily in this case.
Stamp the doily on and off the edges of each piece of Bazzill Hillary Cardstock.

Lay the White Cardstock pieces in the center of the Hillary Cardstock to see if you need to stamp a little more. If you need to, then stamp a few more doilies.

Next, move to the largest snowflake. Stamp images of the snowflake to further fill in the border around the pages.


Now move to the smallest stamp, the small snowflake, and fill in the remaining gaps.

Set the White Cardstock on top of the green to see how the images look.

To conserve paper, you can cut the center from the Hillary Cardstock to use as mats for your photos. Insert the Hillary Cardstock into the trimmer at the 10″ mark.


Cut from the bottom edge of the paper up to the 10″ mark on the blade guide.
 Rotate the paper and cut from the previous cut to the 10″ mark again.

Rotate 90 degrees one more time and cut from the previous cut to the edge of the paper. You should end up with an 8×10 rectangle and a U'-shaped piece of cardstock.


Adhere the white CS to the Green “U” so your pages look like this:

Now we're ready to really decorate!
- Rub the Riding Hood Red ink pad across the White Cardstock area of the page to create a sort of mat.
- Ink up the Doily stamp with Old Olive ink and stamp one on each page in the white area.
- Stamp two more doilies on a scrap of white cardstock and cut out the centers. Set aside. Save the scrap since we'll use that on another project later ;)


- Next, move to the largest snowflake stamp. Stamp “2nd generation” images around the pages on the White Cardstock. 2nd generation stamping is when you ink up the stamp, stamp off onto a scrap, and then stamp a lighter image onto your project.


- Repeat 2nd generation stamping using the small snowflake stamp.
- Use one of the flourish stamps from the Christmas in New York set. Stamp in Old Olive a flourish on each page, near the doily.
- Using the music stamp from the October Afternoon Thrift Shop set, stamps 3-4 strips of music in a grouping on each page using Black Ink. You can add several groupings to each page.
 Use a scrap of paper as mask to stamp a journaling spot. Cover the area you don't want the ink on with the scrap of paper.

Ink up the Making Memories journal spot stamp from the Christmas set with black ink and stamp onto the upper right corner of the layout.

Remove the scrap to reveal the journal spot.
 In red stamp “Merry Christmas” and any other sentiment you want onto the page.

- Add photos, matting them on the scrap we cut from the center of the page if desired.
- Punch the Upper Crest border on the 1″ x 12″ Red Cardstock strip and insert strips of the border under some of the photos.
- Using a black pen, add faux stitching around the edges of the White Cardstock and on the red border strips.
- Add the Doily centers to the pate using 3D Foam Adhesive.
- Color gems with Copic Marker and add to the center of the Doily centers.
- Add a gem to each of the stamped flourishes.
- Add journaling stickers with an Anna Griffin epoxy circle in the center of one of the journaling stickers.
 Tie baker's twine in each button. Add a glue dot the back of a button.
 Stick it to a piece of Red Organdy Ribbon with pinked edges.


Add another glue dot under the button and fold the ribbon over to create a two layered tab. Add another glue dot and add to page as pictured. Repeat to create a second ribbon/button tab and add to the page.

And that's it–easy, economical scrapbook page!
You need to do a video… thank you for sharing i love the end result.
Love this!!