I included a link to a tutorial on making rosettes in my newsletter but the link is not working. Here is the correct link: Making Rosettes
And I am posting it here for you as well!
I've seen these awesome rosettes on banners and layouts but wasn't sure how to make them. I learned this technique at CHA Winter 2008 while doing a make-n-take at a booth. The paper strips they used were pre-scored (came in a kit) but I figured I could do it myself a home.
1. Cut a strip of paper 4 times longer than the diameter of the rosette. If you want a 3″ wide rosette, the paper needs to be 12″ long. The width of the strip should be half the width of the final rosette. In the case of a 3″ rosette the paper strip should be 1.5″ wide and 12″ long.

2. Fold the paper strip accordion style every 1/4″ or so.

When you're finishing folding, it should look something like this:

The closer the folds, the more fluted and detailed your rosette will be. If the folds are too far apart, you rosette won't collapse into a ring correctly (we'll be doing this later). I like to fold over a little a flap, flip the strip over and fold from the other side. Then I flip the strip over and fold over a flap again. Once you have it started, you can use the rest of the accordion as a guide to see how deep to fold. The folds don't have to be perfectly straight (check out the right side of my strip! LOL)-just as long as the folds are all about the same size. Perfection is not necessary here.
3. Put adhesive on one end of the strip. Only put about 1/4″ or less wide strip of adhesive.
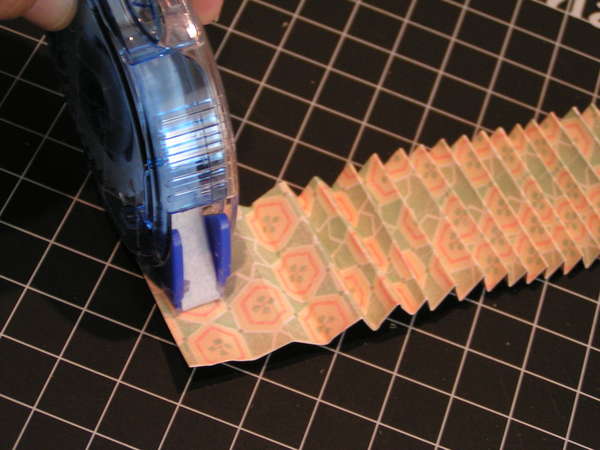
4. Fold the strip around to form a ring.

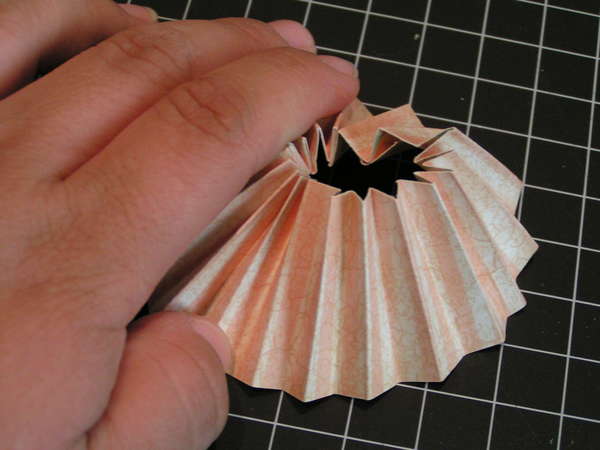
5. Adhere the ends of the strip to one another making sure that the “hills” of the accordion folds meet up with the “valleys”. When adhered, the folds should be nested in one another. You can see the nested folds at the 12 o'clock position in this pic.

6. Stand the ring upright on the table:

7. Push the bottom of the ring outwards and pull the top in to form a teepee or cone shape.

Push the top of the teepee down towards the table.
The bottom of the teepee will fan out and the rosette will form.

8. Adhere to your project using very strong adhesive like glue dots, hot glue, or Zip Dry. You might want to sandwich the rosette between two circles before gluing to help keep it flat.

You can use the rosettes on a banner (like I did) or on a layout as an alternative to flowers, buttons, or circles.
The project I made at CHA where I learned how to make these rosettes is the explosion box with the clown on top at the 9 o'clock position in this pic:

The rosette forms the collar of the clown's outfit. It is sandwiched between two pieces of chipboard to help keep it rigid.
Here's another sample:

Here's one up close:
Thanks! I think I’ll make a banner for my New Years Eve party using the rosettes:)
Love it… thanks for sharing…Are you doing Tour De Crop on Saturday?
OMG I love this..I’m going to hve to try this today!
Again, thank you for showing me how to do these. See you at the Table…
Cool! I’m going to have to incorporate rosettes in a future project.
love the scrap banner on this post it’s so darn cute..actually I love all your banners!
These are beautiful!!