I love acrylic and creating “clear”. Working with acrylic sounds complex, but really it can be very easy. One of the cool things about acrylic is that you can work on the front and the back of acrylic items–this gives your project extra dimension, especially when working on layouts. On this layout I used two simple and quick techniques with acrylic that are easy to do and copy.
Clear Scraps not only makes cutting edge acrylic albums but they also make diecuts from acrylic and chipboard. One of my favorite products from Clear Scraps are the Clear-N-Chip Diecut Packs. These themed packs contain one 12×12 diecut acrylic sheet and one coordinating 12×12 diecut chipboard sheet. There are LOTS of pieces in each pack and they are so versatile, you can use them on multiple projects.

On this layout I used the Clear-N-Chip Carson's Park Pack which is filled with gears and arrows. Just because this Pack screams “boy” doesn't mean I am limited to boy projects with it–the beauty of chipboard and acrylic is that you can customize them to any theme or color you need.
I chose the acrylic arrows from the Clear-N-Chip Carson's Park Pack. First, remove the protective plastic from both sides of the acrylic shapes.
Since these shapes are relatively small, I ran them through my Xyron “X' Adhesive Sticker Maker. Adhering acrylic can be challenging but one of the best rules I follow is to cover the entire surface of the acrylic item with adhesive. That gives the piece a uniform look –usually the edges of the adhesive (i.e. tape) show up when working with acrylic. By covering the entire surface with adhesive there are no edges to show.
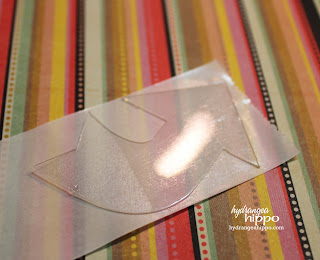
Clear Scraps diecut acrylic shapes are pliable so you can bend them slightly if needed to fit through the Xyron “X”. After the acrylic shapes have been run through the machine, rub them to create a sticker (follow the instructions on the sticker maker). Remove the top plastic layer.
Now the acrylic arrows are actually stickers! See how the adhesive is evenly distributed across the entire surface of the acrylic arrow?
That's what we want! Peel the acrylic arrow stickers and adhere them to your patterned paper–what you see through the arrow is what the pattern on your arrow will be.
Trim around the arrows with scissors.
Now they are decorated on the back with patterned paper.
To give these arrows more dimension, I decorated the fronts with rub-ons. I used Hambly rub-ons but you can use any brand of rub-on or a stamp with Staz-On ink.
I laid my rub-ons on both arrows at the same time and just rubbed portions of the images onto the tops of the arrows. I did not want to cover the arrow because I wanted the patterned paper from the bottom layer to peek through.
The contrast between the rub-ons on the front of the acrylic arrow and the paper on the back gives the arrows depth and dimension.
After the rub-ons were added, I added the arrows to my projects. The acrylic gives the slightest bit of shine which is balanced out with the satin trim I used to make some flowers on the page. The arrows and their glossy contrast to the matte paper of the layout draw the eye around the page to my journaling and a photo to which the arrows are pointing.
Posted by Jennifer Priest
So cute! Love the gears :)
WOW Jennifer, This is an Awesome way to use Acrylic. I am still a beginner and have just got to Acrylic but I have wondered how to use it since it’s see through. I have a little Mini Book that I would like to put some photos of my Grandchildren in but with the back of the photo showing through does this mean that every page and photo have to be the same or is there an alternative method that you may know. These shapes you have and the Matching Chipboard are a Fantastic Idea. Where would I be able to purchase them. Thanks again for your great Demo and Tip about the Xyron.
Kind Regards,
Beverley…..
That looks great! Thank you for that tutorial!! I love it!!