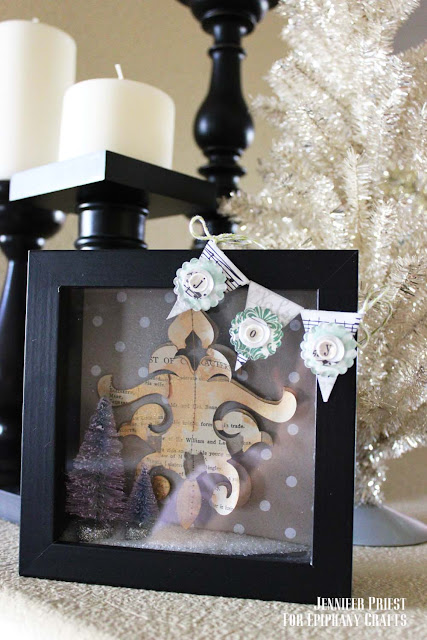
Today is the first day of the Twelve Days of Christmas Crafts!!! Every few days from now until December 24 I will be showing you a fun Christmasy project you can create to decorate with or use as a gift during this holiday season.
Today I am sharing a shadowbox I made for the Epiphany Crafts blog yesterday. By the way, there is a giveaway for the Epiphany Crafts Scallop Shape Studio I used for this project going on now on their blog, here: http://epiphanycrafts.blogspot.com/2011/11/shadow-boxes-more-with-epiphany-crafts.html. All week long they are featuring the Scallop Shape Studio so be sure to check the blog for some amazing projects this week.
Holiday decor does not have to be expensive or permanent to set a festive tone. I have had this Ribba frame from Ikea in my closet for a few years. It measures 5.5″ square, super easy to decorate with a 6×6 piece of scrapbook paper. The Free Bird line from Authentique Paper would be perfect to use in this frame because of it is 6×6 size and affordable 39 price. You can change out the insides every season or make a permanent holiday decoration, like I did here.
First, cut a piece of 5.5″ square scrapbook paper. This paper is by American Crafts.
Next, adhere the paper to the back of the frame if making a permanent display.
Die cut several vintage book pages, pages from an old phone book, or scrap paper with a Sizzix die. Die cut the same shape from chipboard and stitch the layers of book pages or paper diecuts to the chipboard die cut with a sewing machine. Paint the back and edges of the diecut with gold paint for a distressed, leafed look. Adhere to the center of the back of the frame with 3D Foam Dots.
Adhere two mini bottle brush Christmas trees inside the frame on the left hand side.
Lay the frame glass side down on a table and add about 1 tablespoon of Diamond Dust glitter to the frame. Place the back on and secure in place. This will look like snow in the bottom of the frame.
Cut 3 banner pennants from scrap paper. This paper is from Echo Park's Victoria Gardens Collection. Use a neutral color palette for the pennants so the words on them can be changed wit the season. Glue a piece of baker's twine to the back of the pennants and tie in a bow on each end. Adhere the pennants to the upper right corner of the frame using 3D Foam Dots.
Create scalloped shapes using the Epiphany Crafts Scallop Shape Studio and scrap paper to create a base for the letters on the banner. Add letter stickers, like these small ones from Authentique Paper, to scrap paper and make letters for the banner using the Epiphany Crafts Round 14 Shape Studio.
Supplies:
Epiphany Crafts Scallop and Round 14 Bubble Caps, 3 each = about $1
Twine from The Twinery, 18″ = about $0.10
Ribba Frame from Ikea = $4.99
Patterned Paper (1/4 Sheet plus about 2″ x 6″ worth of scraps) = $0.50
3 Vintage Book Pages from $2 book at Salvation Army = Negligible
Chipboard = $0.10
3D Foam Dots (about 1/8 of the pack) = about $0.50
Bottlebrush Christmas trees (2 from 5 tree pack) = $3
Diamond Dust Glitter (1/8 of the pack) = $0.50
Authentique Alpha Stickers (3 pieces only) = $0.15
Total Cost = $10.84
Not included in cost:
Gold Acrylic Paint
Sewing Machine
Sizzix Diecut Machine and Die
Epiphany Crafts Round 14 and Scallop 25 Shape Studios
Hope this inspires you to put a little new life into an old frame. It's time to make our homes festive for the season :) and I know this little shadowbox is gonna be perfect next to my tinsel trees on my dining room table. Hope you find the perfect spot for your frame too!
Happy Creating :)
Jennifer


Beautiful altered frame!! I love the idea of changing out the frame and banner for the seasons. Thanks for the fantastic idea Jennifer!! I love decorating for Christmas and I am looking forward to seeing your creations!